
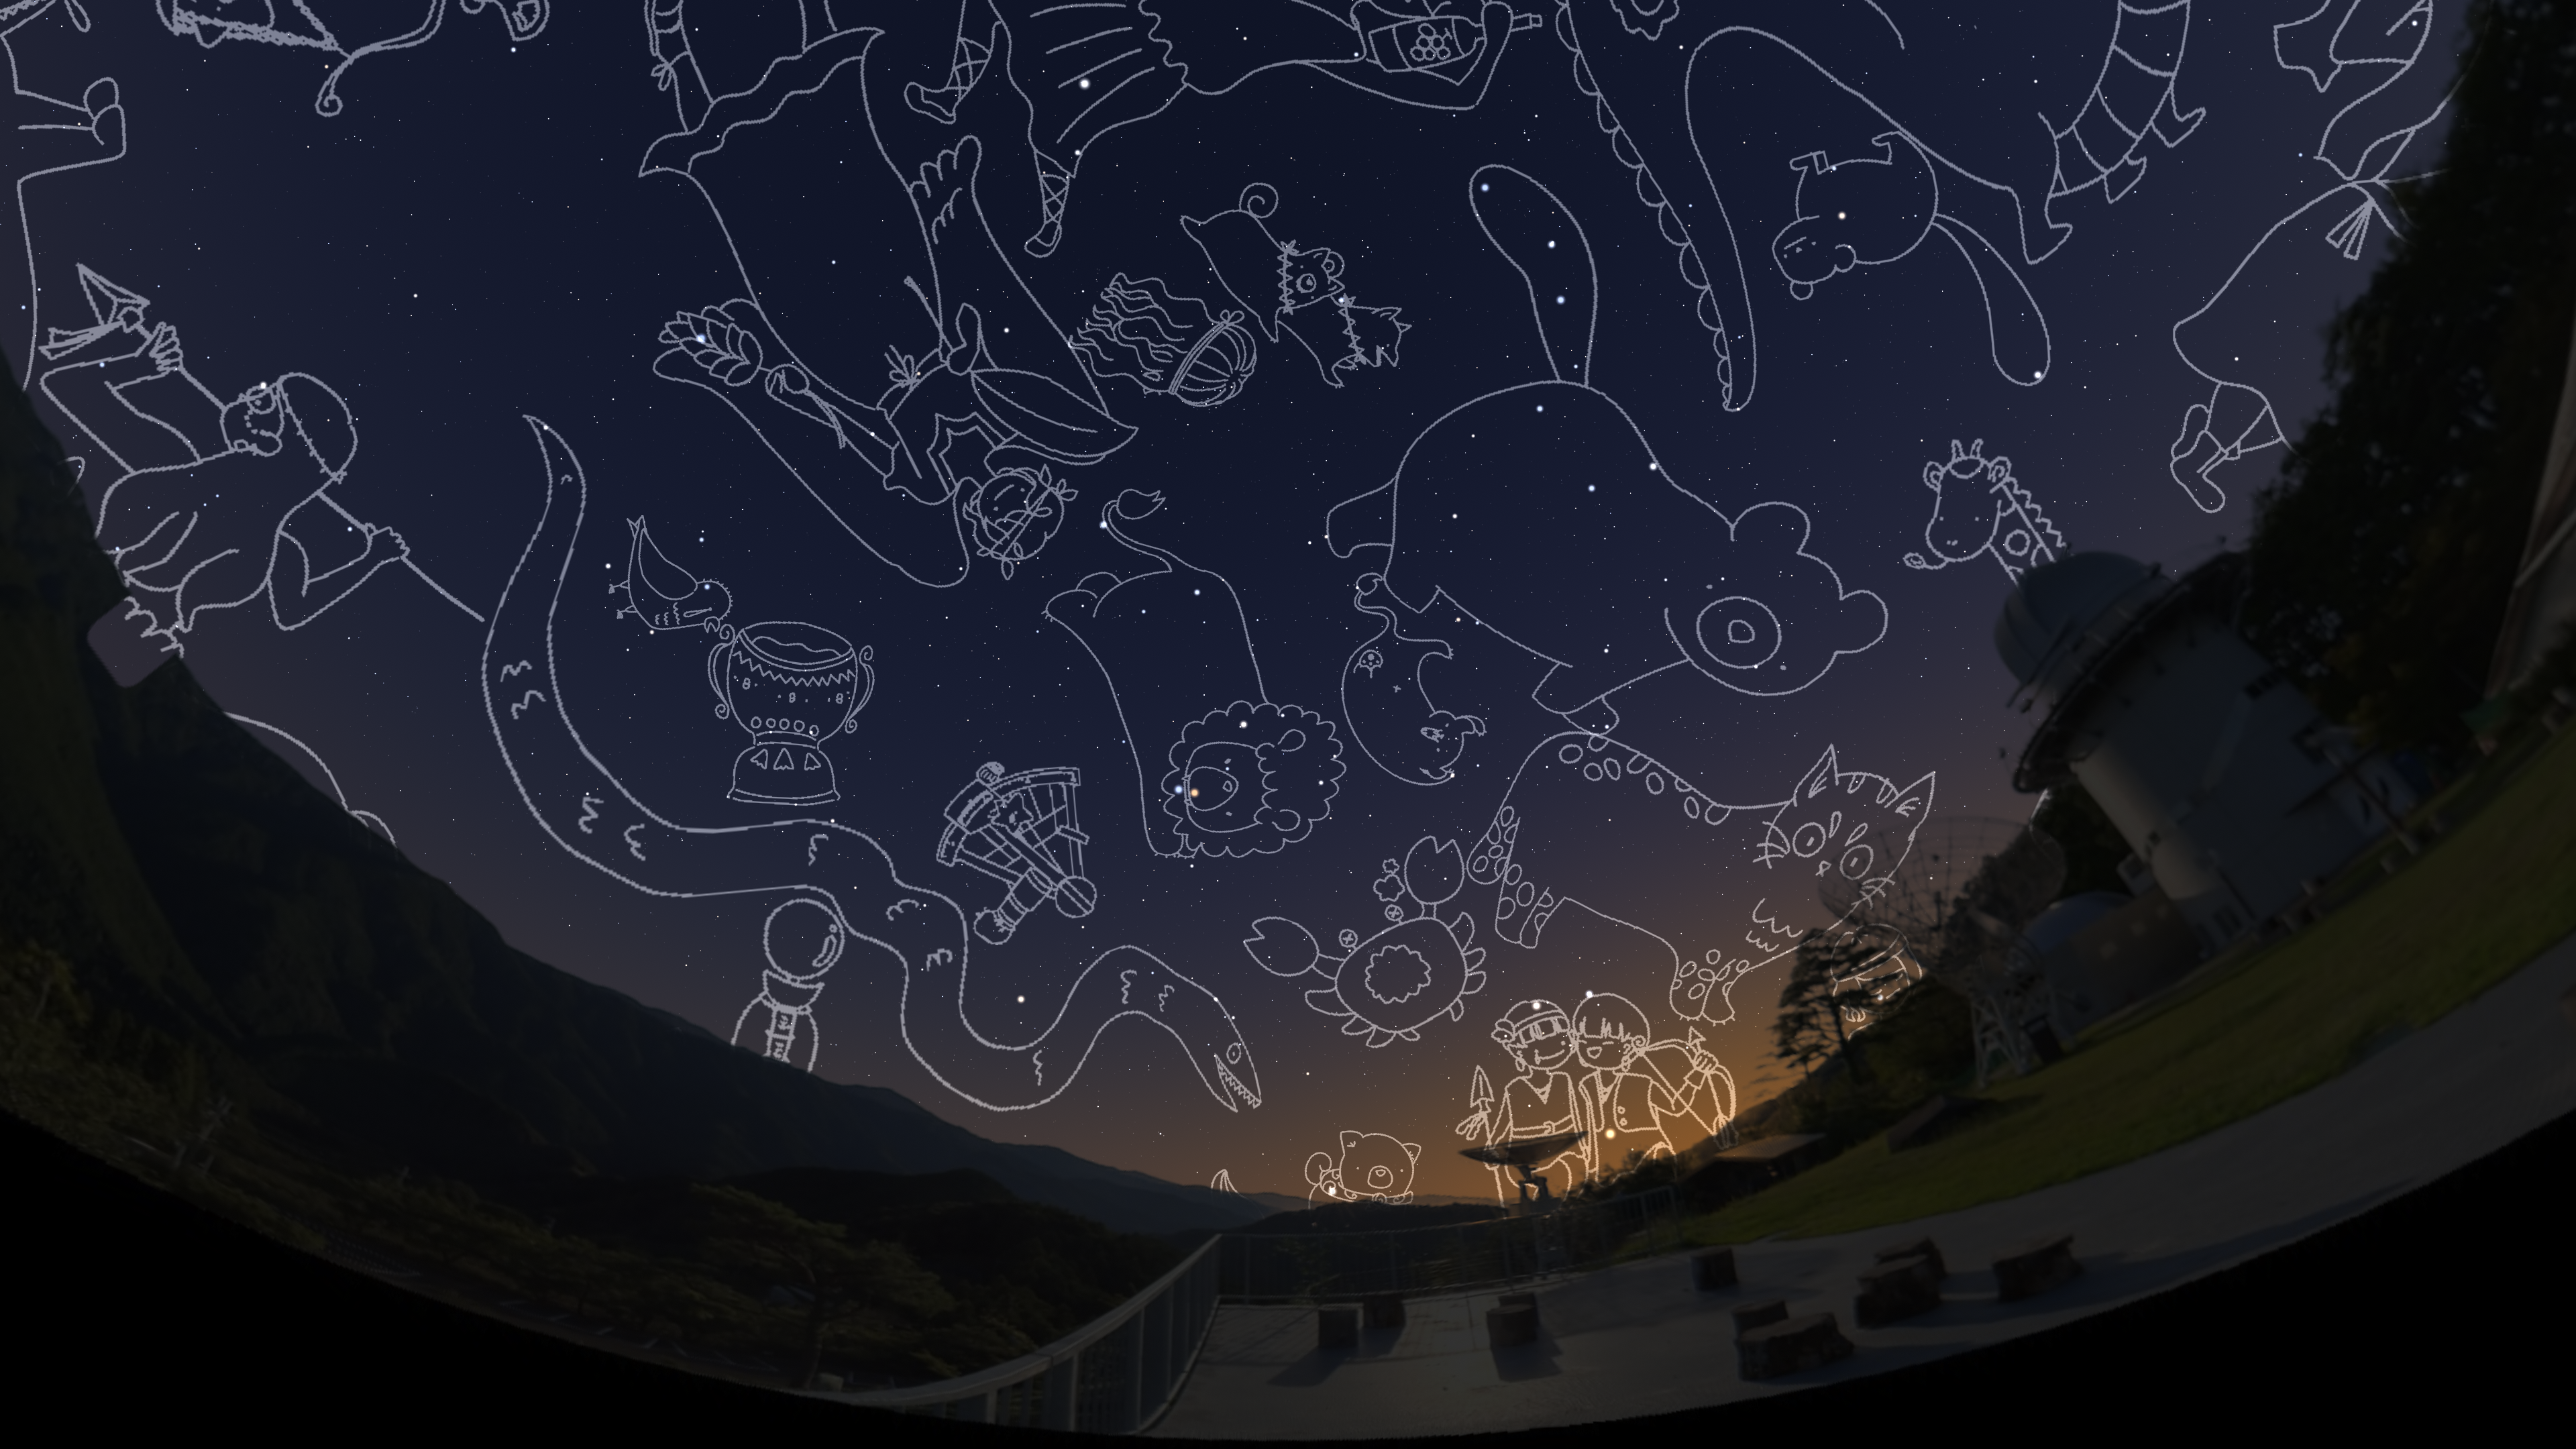
Interstellar Console (ISC) is an open-source, free, professional digital planetarium projection system developed by the staff of the Misato Astronomical Observatory for regular live projections at the observatory. By adding adorable original constellation illustrations to Stellarium and finely controlling the rendering of stars and the Milky Way, it has been made suitable for everything from children's projections to movie production. The control panel (GUI) was designed with ease of use during live projections in mind, referencing products from Konica Minolta and Goto digital planetarium.
Our software is ideal for new hardware installations, providing backup PCs for full-dome projection, recovering from malfunctions, and even for flat-panel projection. Of course, with the right hardware, you can even create a professional-grade digital planetarium for your school's festival. It's fun to build your own projector and dome screen at your school.
The features are as follows:
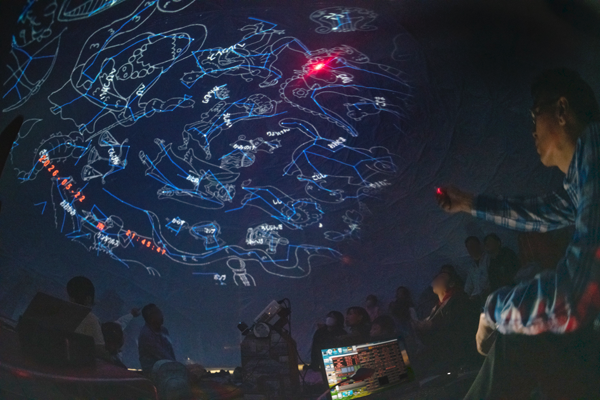
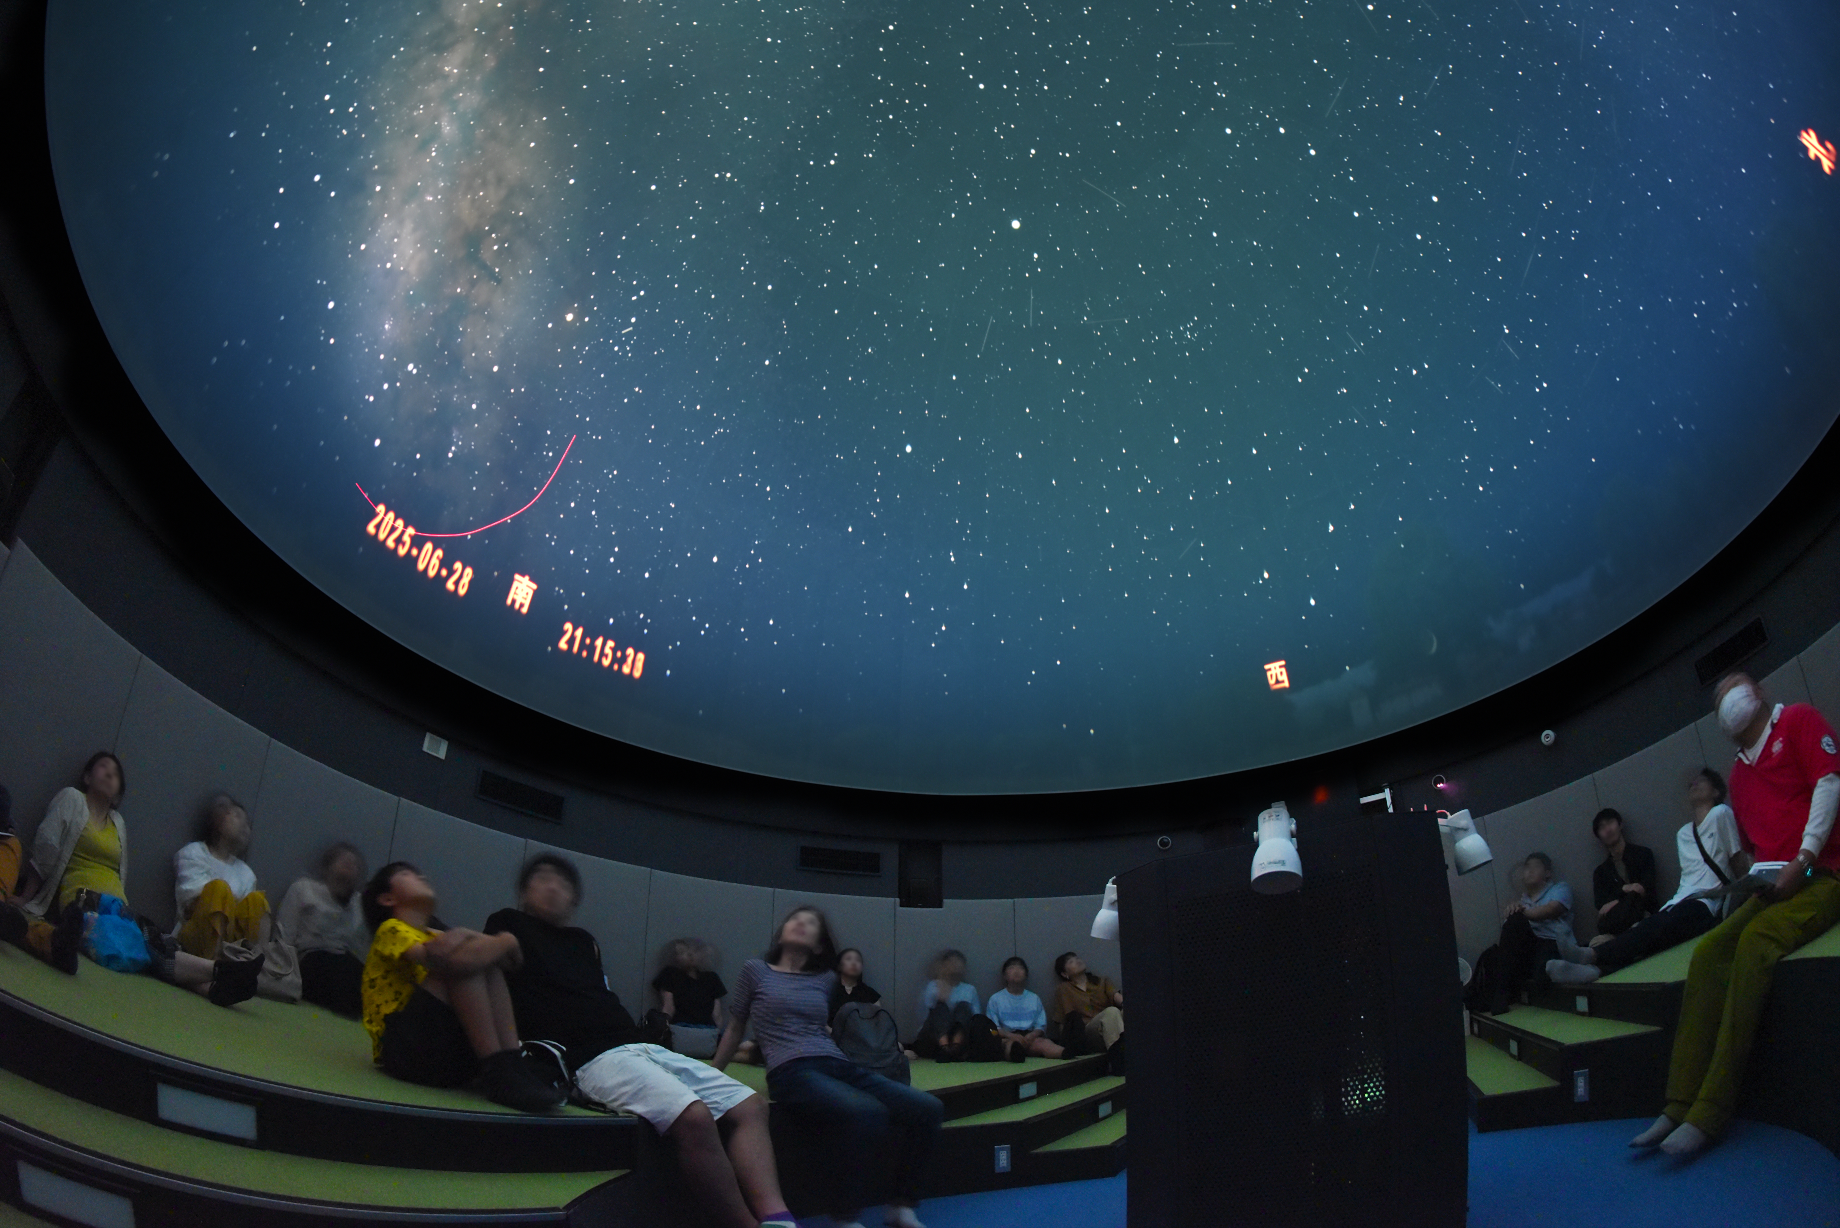
Since February 22, 2025, Misato Astronomical Observatory has been using this system for its regular live planetarium shows. There are five guide staff members, and none of them have any major complaints about the system. As a result, Misato Astronomical Observatory has decided that it will no longer consider using a proprietary system for its planetarium shows.
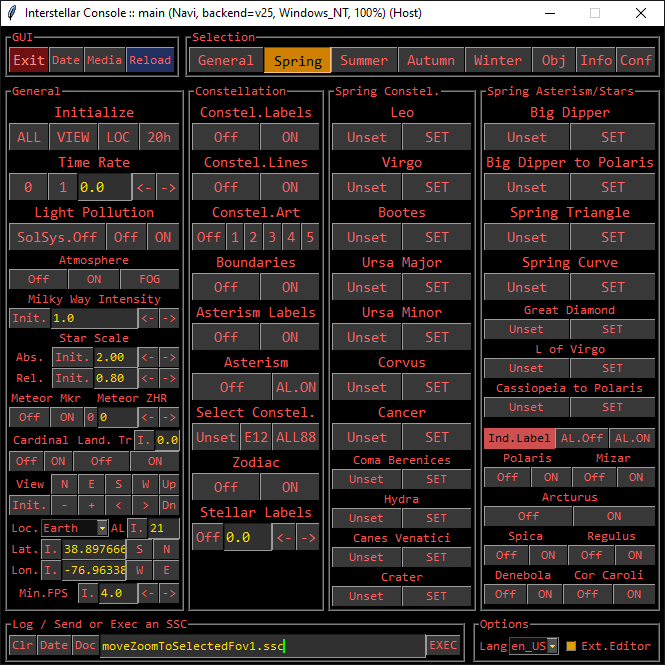
For live presentations, a GUI that prevents operational errors is required, so buttons need to have a large surface area. However, planetarium consoles have far too many ON/OFF switches, making it impossible to create a flat GUI for them. Therefore, a tab-based design has been adopted.
The features are as follows:
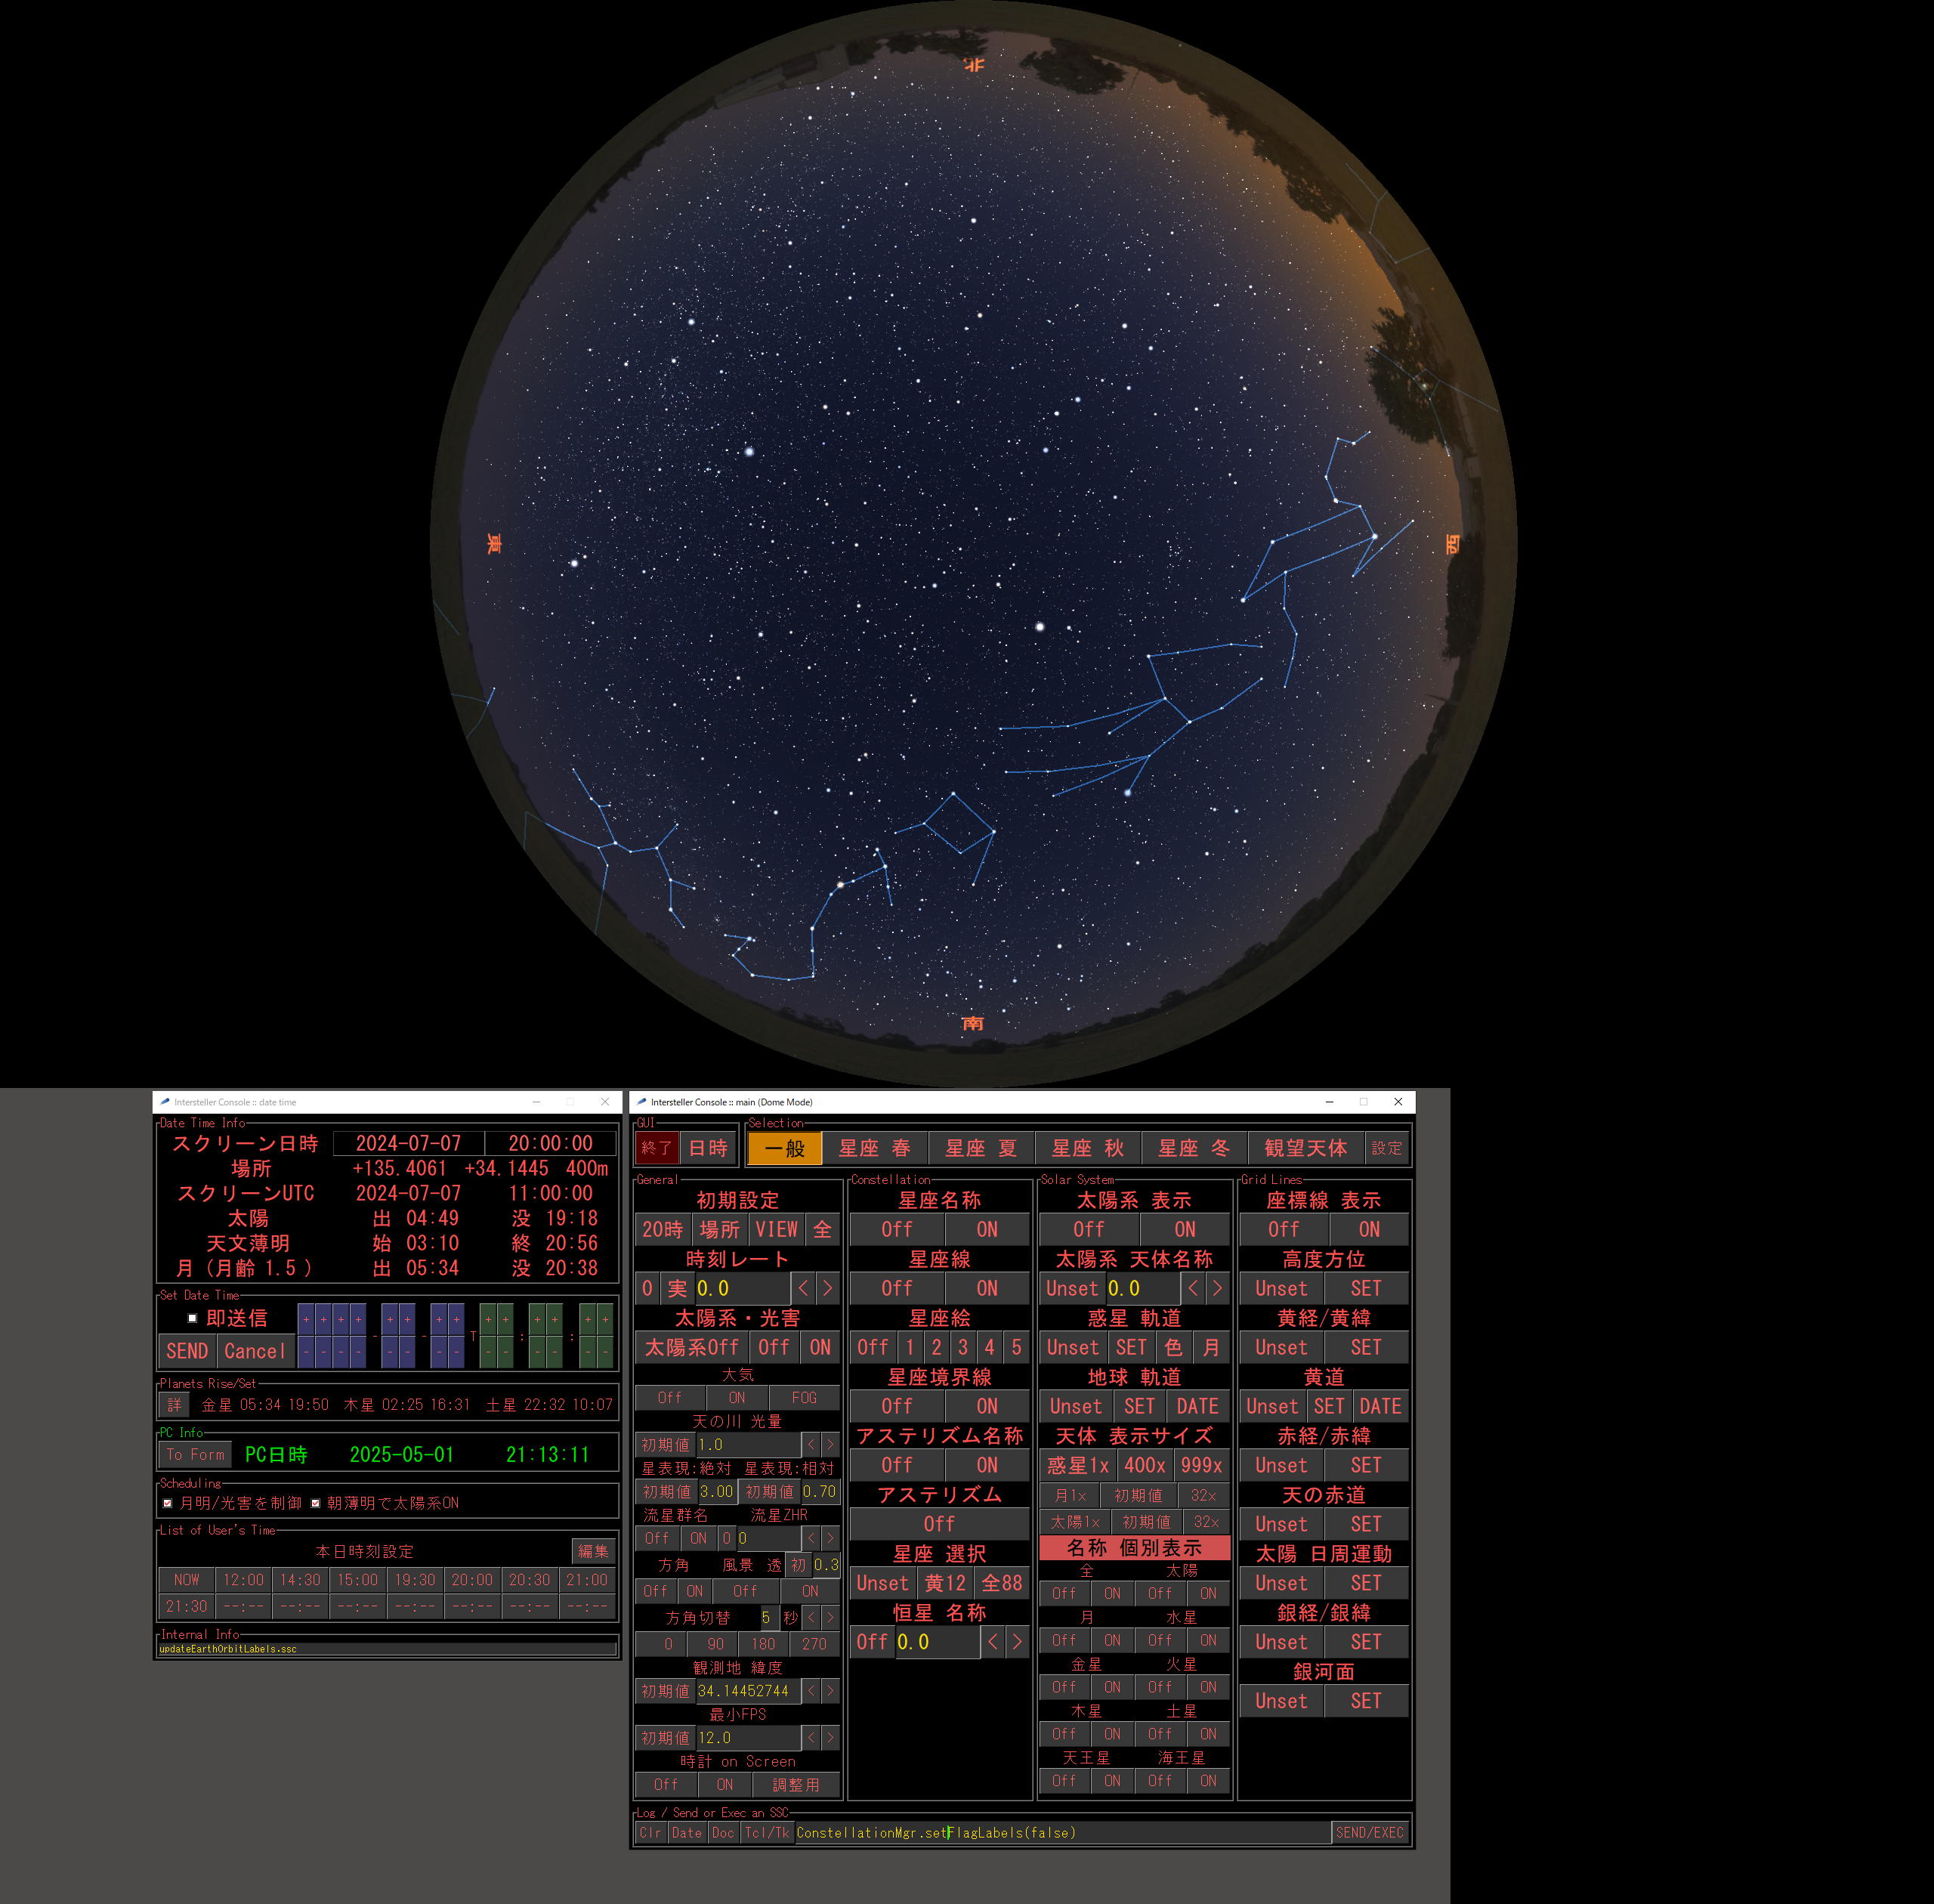
You can view all the main GUI patterns by clicking the links (1 to 8) at the bottom of the image on the right. Please check what functions are available.
We have also received reports from other individuals who are primarily volunteering to participate in the projection.
Copyright (C) 2025-2026 Misato Observatory
This program is free software: you can redistribute it and/or modify it under the terms of the GNU General Public License as published by the Free Software Foundation, either version 3 of the License, or (at your option) any later version.
This program is distributed in the hope that it will be useful, but WITHOUT ANY WARRANTY; without even the implied warranty of MERCHANTABILITY or FITNESS FOR A PARTICULAR PURPOSE. See the GNU General Public License for more details.
You should have received a copy of the GNU General Public License along with this program. If not, see https://www.gnu.org/licenses/.
Copyright (C) 2025-2026 Misato Observatory and Marin Tsunemi
Using constellation art files in art/ directory is licenced only for Interstellar Console.
Distribution without Interstellar Console is not permitted. If you want to use them with a software other than Interstellar Console, please contact us.
If you are using only one PC, please set up only the host machine as follows.
cmd.exe" into the search box on the taskbar,
launch the command prompt, and then close it using the "x" in the upper right corner.
C:\Program Files\Stellarium\scripts\interstellar-console\.
| Stellarium | Interstellar Console | ||
|---|---|---|---|
| 1. | stellarium-24.4-qt5-win64.exe | ... | interstellar-console_1.4a.zip |
| 2. | stellarium-25.4-qt5-win64.exe | ... |
A remote machine is a PC used to control the Stellarium + Interstellar Console on the host machine via the network. It can be operated from the remote machine using the exact same GUI as the host machine. Touchscreen PCs (Windows, macOS) are also supported.
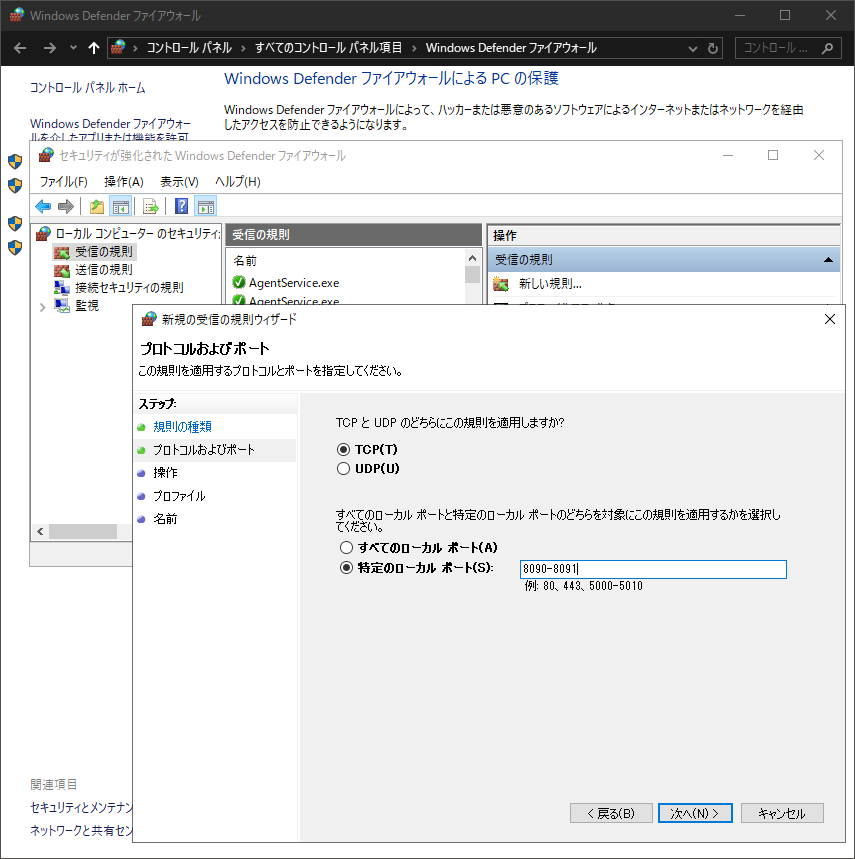
-> Inbound Rules -> New Rule in Windows Defender Firewall and set the port number.
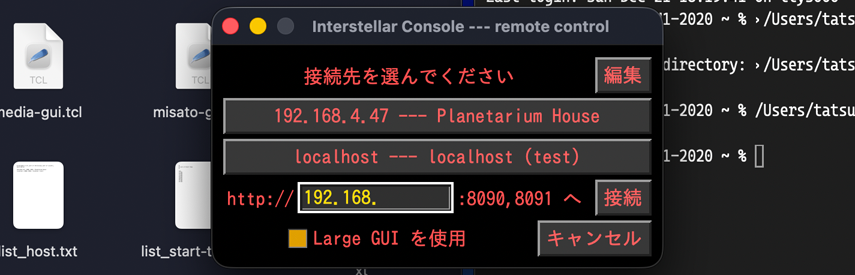
interstellar-console directory, run isc_remote.en.exe, and enter the IP address to connect.
interstellar-console folder inf Finder, drag and drop isc_remote.en.sh into Terminal, enter the IP address, and connect.
Please select one of the operating modes according to your needs. The operating mode can only be determined via the host machine's GUI.
If you are using Interstellar Console, please contact Misato Observatory (email: info(at)obs.jp) for research purposes. If you send us photos of the site, we will post them on this webpage.
If you encounter any problems with installation or operation, please don't hesitate to ask questions. Your questions greatly help us improve the software.
Interstellar Console is free to use, even for commercial purposes involving fee collection. Users are free to modify the source code to customize the software.
If you would like to request support for languages other than Japanese and English in ISC, or customization specific to your observation site, please contact Altair LLC, a company that plans and produces planetarium programs.
In the following explanation, the filenames of the configuration files covered in each subsection will be indicated by the title,
followed by "<ooo.o>".
All configuration files are C:\Program Files\Stellarium\scripts\interstellar-console located in plain text format.
Please edit them with your preferred editor, such as Windows Notepad.
<exec-args.txt>
Under certain circumstances, Stellarium may crash in Dome mode.
In that case, install the latest version of Interstellar Console and
change exec-args.txt like this:
# -no-fullscreen
To
-no-fullscreen
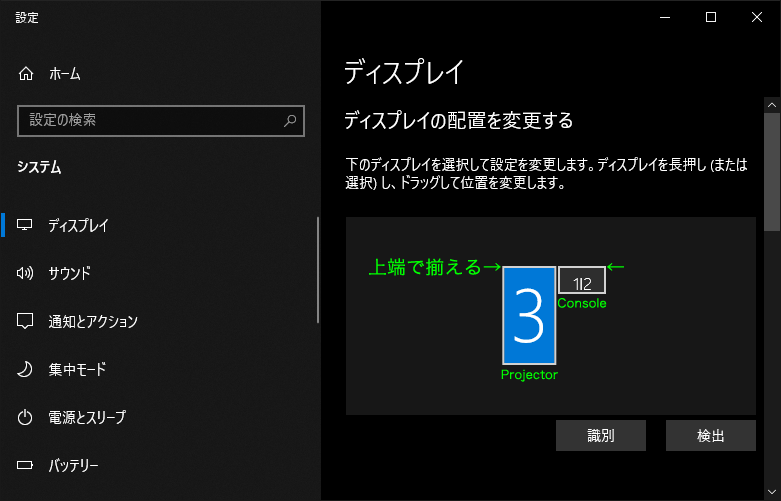
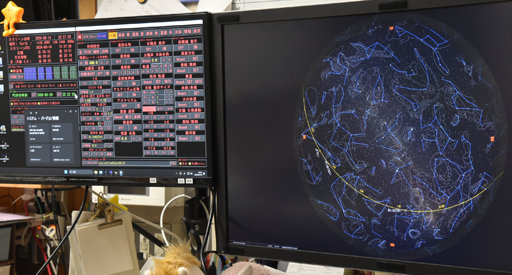
With the above settings, Stellarium will launch in Dome mode with the window maximized instead of fullscreen. Since Stellarium has a title bar, which can interfere with fisheye projection on the default Windows landscape desktop, switch the projector desktop to portrait orientation in Windows' display settings (see image on the right). With these settings, the title bar will not be a hindrance.
The viewport center will be slightly shifted, so adjust the x and y args
of StelMovementMgr.moveViewport() in localInitView.ssc.
Positioning is easiest using the "Viewport X" and "Viewport Y" settings within the Configuration frame in the "Settings" tab of the main GUI.
If the white color of the window title affects the projection,
you can use Interstellar Console's black mask feature to prevent the window title from being projected.
Enable and adjust the following settings for the black mask in exec-args.txt:
# -black-mask 2160,64,-2160,0
To
-black-mask 2160,64,-2160,0
The parameters for the mask are, in order: width, height, position x, and position y.
<localConfig.ssc>
If your PC's processing power is insufficient, the initialization process may not complete successfully. In that case, please try changing the value of
safe_init_factor to 1.5, 2.0, or 2.5, as shown below.
  // If initialization is unstable, increase the following value.
  // Increasing the value will result in slower initialization.
  // The default value is 1.0.
  var safe_init_factor = 1.5;
In dome mode, Stellarium is designed to be projected onto a full-dome screen, so it will launch in full screen. If it does not appear on your intended desktop, follow these steps to configure it.
Change the following line of config.ini in C:\Users\USERNAME\AppData\Roaming\Stellarium:
[video]
screen_number                          = 1
"1" indicates an extended desktop. By default, "0" is set.
The setup is now complete. Please boot into dome mode and verify.
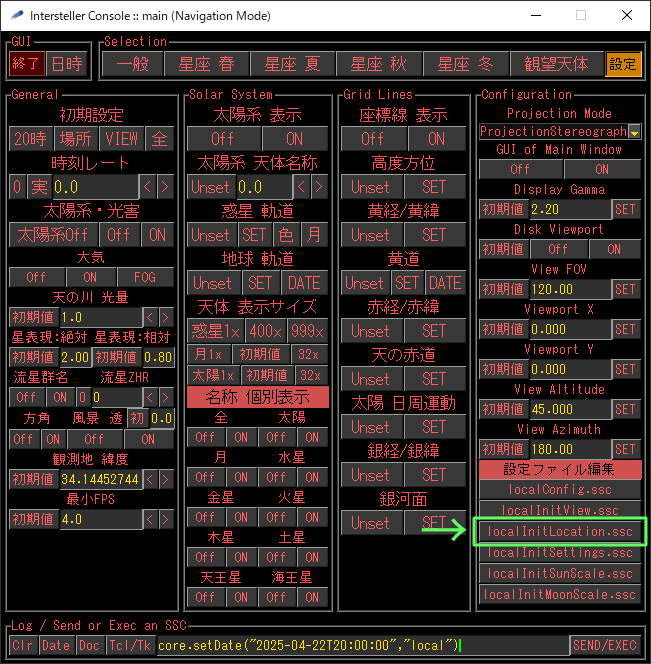
<localInitLocation.ssc>You can edit the settings file from the "Config" tab in the main GUI, using the "Edit Configuration File" button within the Configuration frame.
// Set the Application Language when using ISC.
// If you do not configure the following, the language settings in config.ini
// will be applied upon first startup.
core.setAppLanguage("en_US");
lon, the latitude to lat,
and the altitude to altitude.
By default, it is set in the format hours, minutes, seconds and degrees, minutes, seconds, as follows:
// longitude. E is +ve. values out of the range -180..180
const lon_h = -77;
const lon_m = 2;
const lon_s = 11.8;

// latitude. N is +ve. values out of the range -90..90
const lat_d = +38;
const lat_m = 53;
const lat_s = 51.6;

// altitude in meters.
const altitude = 21.0;

const lon = lon_h + (lon_m/60.0) + (lon_s/3600.0);
const lat = lat_d + (lat_m/60.0) + (lat_s/3600.0);
localInitLocation.ssc:
// Set 1 to 2nd arg to keep timezone of 1st arg when using core.setObserverLocation()
core.setTimezone("UTC-05:00", 1);
//core.setTimezone("UTC-04:00", 1);
Since this code is written in JavaScript, you can also add code to automatically set the time zone.
If you want to change the GUI language, please modify isc-lang.txt as follows.
en
The available strings are en or ja. These represent English and Japanese, respectively.
<localConfig.ssc>
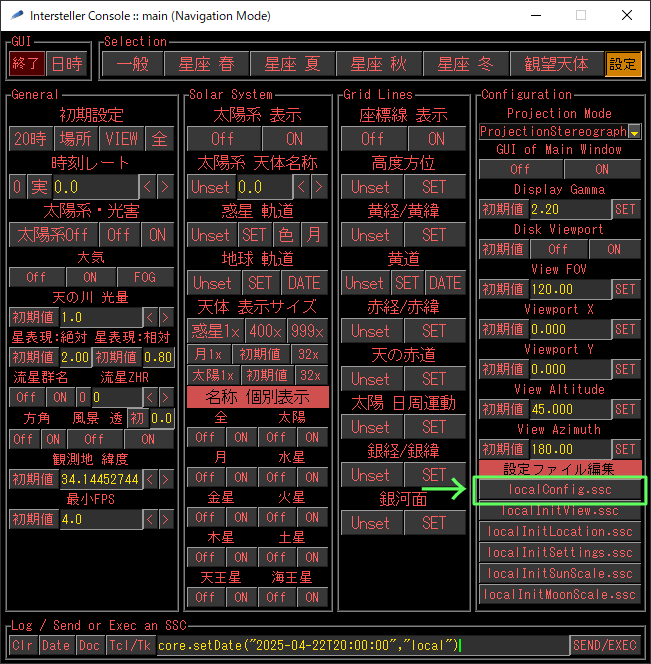
You can edit the settings file using a button in "Edit Configuration File" within the Configuration frame,
accessible from the "Conf" tab in the main GUI.
Setting localConfig.ssc can meet most customization needs.
The settings can be configured for each operating mode, as follows: The settings items are, in order: font size, hiragana label format (for Japanese only), line width (pixels) and color, label color, star representation [absolute/relative], Milky Way [brightness/color intensity], foreground transparency, astronomical information display format, minimum number of FPS, sun/moon display size, and foreground selection.
  if ( getFlagDomeMode() != true ) {

    //
    // Navigation Mode
    //

    // Font size
    var constellation_font_size = 18;
    var asterism_font_size = 15;
    var star_font_size = 15;
    var others_font_size = 15;
    // Ruby of labels: "Hiragana" or "Kanji+Hiragana"
    var individual_star_labels_ruby_style = "Hiragana";
    // Lines
    var line_thickness = 1;
    var constellation_lines_color = new Color(0.10, 0.30, 0.50);
    var asterism_lines_color = new Color(0.7, 0.3, 0.1);
    // Labels color
    var constellation_labels_color = new Color(0.8, 0.8, 0.8);
    var asterism_labels_color = new Color(0.8, 0.8, 0.8);
    var star_labels_color = new Color(0.8, 0.8, 0.8);
    var individual_star_labels_color = new Color(0.85, 0.85, 0.85);
    // Stars, Milky Way, etc.
    var absolute_star_scale = 2.0;
    var relative_star_scale = 0.8;
    var milkyway_intensity = 1.0;
    var milkyway_saturation = 1.0;
    var landscape_transparency = 0.0;
    // Select from "AllInfo", "DefaultInfo", or "ShortInfo"
    var selected_object_info = "AllInfo";
    // Saving power when lower time-rate (default is 18)
    var min_fps = 4.0;

    // Sun and Moon scale
    var sun_scale = 4.0;
    var moon_scale = 4.0;

    // Landscape selection
    // Set the landscape to Guerlain (France)
    var landscape_id_default = "guereins";
    // Set the landscape to Hurricane (Washington)
    //var landscape_id_default = "hurricane";
    // Set the scenery at Misato Observatory
    //var landscape_id_default = "misato_observatory";
    // Set the scenery around Wakayama University
    //var landscape_id_default = "wakayama_university";

  }
  else {

    //
    // Dome Mode
    //

    // Font size
    var constellation_font_size = 35;
    var asterism_font_size = 30;
    var star_font_size = 30;
    var others_font_size = 30;
    // Ruby of labels: "Hiragana" or "Kanji+Hiragana"
    var individual_star_labels_ruby_style = "Hiragana";
    // Lines
    var line_thickness = 2;
    var constellation_lines_color = new Color(0.10, 0.30, 0.50);
    var asterism_lines_color = new Color(0.7, 0.3, 0.1);
    // Labels color
    var constellation_labels_color = new Color(0.8, 0.8, 0.8);
    var asterism_labels_color = new Color(0.8, 0.8, 0.8);
    var star_labels_color = new Color(0.8, 0.8, 0.8);
    var individual_star_labels_color = new Color(0.85, 0.85, 0.85);
    // Stars, Milky Way, etc.
    // 8m planetarium dome screen at Misato Observatory
    var absolute_star_scale = 3.0;
    // 9m telescope dome screen at Misato Observatory
    //var absolute_star_scale = 1.4;
    // common
    var relative_star_scale = 0.7;
    var milkyway_intensity = 1.0;
    var milkyway_saturation = 1.0;
    var landscape_transparency = 0.3;
    var selected_object_info = "None";
    var min_fps = 10.0;

    // Sun and Moon scale
    var sun_scale = 4.0;
    var moon_scale = 4.0;

    // Landscape for Common
    //var landscape_id_default = "misato_observatory";

    // Landscape for Urban
    // Set the scenery around Wakayama University
    var landscape_id_urban = "wakayama_university";

    // Landscape for Rural (Countryside)
    // Set the landscape to Guerlain (France)
    var landscape_id_rural = "guereins";
    // Set the landscape to Hurricane (Washington)
    //var landscape_id_rural = "hurricane";
    // Set the scenery at Misato Observatory
    //var landscape_id_rural = "misato_observatory";

  }
Star rendering, Milky Way brightness, landscape transparency, and minimum number of renders (min_fps) can be adjusted from the main GUI.
The minimum number of frames drawn (min_fps) is the number of frames drawn per second when the time on the screen is not advanced.
Lowering this value will make label display and other elements less smooth, but it will reduce the power consumption of the PC.
After saving the configuration file, click the "ALL" button under "Initialize" in the General frame of the main GUI to confirm the settings.
<localInitView.ssc>"View" refers to aspects related to projection methods and projection coordinates. In the case of projection onto dome screen, it is deeply related to the projector specifications. You can edit this using a button in "Edit Configuration File" section under the Configuration frame in the "Conf" tab of the main GUI.
Settings can be configured for each operating mode. The settings you need to adjust are indicated in the comments below; please change them as necessary.
// Navigation Mode
// Dome Mode
From the "Conf" tab in the main GUI, you can perform view-related operations, including the projection mode mentioned above, within the Configuration frame. Find the optimal values for each setting using the GUI and write them to the configuration file.
The projection mode is set by core.setProjectionMode();
as specified in the configuration file. The available projection modes are as follows:
After saving the configuration file, click the "VIEW" button in the "Initialize" section of the General frame in the main GUI to check the settings.
<localConfig.ssc>
You can change the constellation art by editing the following section in
localConfig.ssc:
  // Sky Culture selection
  // Use art by Misato observatory & Marin Tsunemi with english constellation lines.
  var sky_culture_id = "english_misato-art";
  // Use default art with english constellation lines.
  //var sky_culture_id = "english_default-art";
Specifying "english_misato-art" will use the original constellation art provided by Misato Astronomical Observatory,
while specifying "english_default-art"
will use the original constellation art installed with Stellarium.
The "//" indicates that the code to the right of it will be ignored,
so in the above case, "english_misato-art" is enabled.
After saving the changes, click the "ALL" button in the main GUI's "Initialize" section to apply the settings.
<localInitSettings.ssc>You can adjust settings such as the color of the text and lines, the twinkling of stars, and scattered meteors.
You can edit the settings file from the "Conf" tab in the main GUI, using a button in "Edit Configuration File" section within the Configuration frame.
For more information, please refer to the official documentation on Stellarium Script.
When projecting onto a full-dome screen, the textures included with Stellarium lack realism.
Therefore, we have prepared textures optimized for projection, which also provide sufficient quality when photographing the projection.
These textures were refined through repeated adjustments while comparing them to the "real Milky Way" at Misato Astronomical Observatory,
and the 7 files (they have different gamma values) are placed during setup
C:\Program Files\Stellarium\scripts\interstellar-console\milkyway\milkyway.x.xx.png.
The summer Milky Way is accurately represented from the galactic center to the faintly extending region,
while the winter Milky Way has a more subdued light level, making it much closer to how it actually looks.
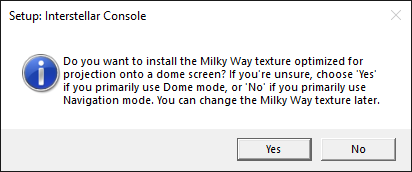
If you answer "Yes" to the question about the Milky Way texture during setup,
milkyway.0.90.png in above files will be installed for use by Stellarium.
If you change the texture later, simply overwrite C:\Program Files\Stellarium\textures\milkyway.png with the new texture.
If the installed texture (milkyway.0.90.png, Gamma value = 0.90) is too dark or too light,
C:\Program Files\Stellarium\scripts\interstellar-console\milkyway
contains seven textures generated with different Gamma values (0.80, 0.85, 0.90, 0.95, 1.00, 1.05 and 1.10).
Please select the one that best suits your hardware.
For further adjustments, please use an image editing tool such as GIMP.
<updateLightMoonPollution.ssc>The following constants are located near the beginning of the code:
// Base parameters for pollutions
const light_pollution_base = 0.0010;
const moon_pollution_base  = 0.0010;
These are parameters that determine the effects of light pollution and the moon. Please change them as needed.
These values also affect solar and lunar eclipses.
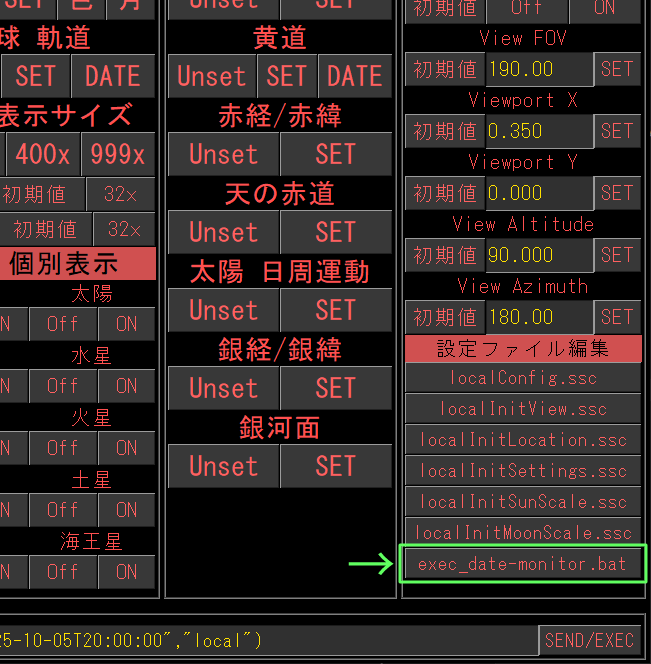
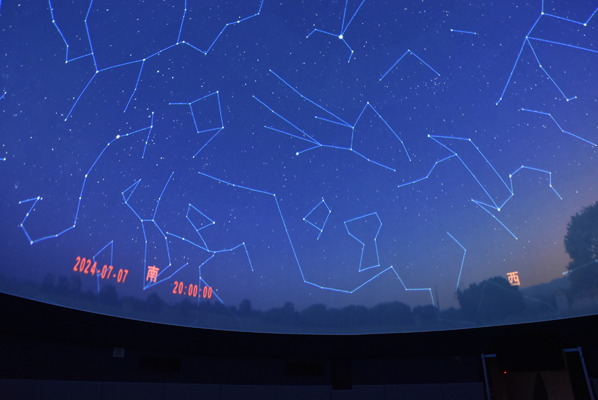
<date-monitor_conf.txt>Stellarium does not appear to have a built-in function to properly display the time when using fisheye projection. To display the time on the dome screen, use the "On-Screen Clock" app included with Interstellar Console, which overlays the app's time display (as shown in the upper right screenshot) onto the full-screen Stellarium window.
Settings for the on-screen clock can be edited from the "Conf" tab in the main GUI, using a button in "Edit Configuration File" section within the Configuration frame.
The on-screen clock can be activated by clicking the "ON" button in the "Clock" section of the General frame in the main GUI. Since it will be displayed on the desktop, the same location as the GUI, adjust the following parameters to ensure it is displayed horizontally to the left or right of the directional indicator (East, West, South, or North) on the dome screen.
When adjusting the position, be sure to activate the on-screen clock using the "Adjust" button in the "Clock" section.
Using the "Adjust" button will immediately reflect the changes of date-monitor_conf.txt.
The parameters are explained in detail below.
FONT_SIZE=24
RADIUS_FOR_PLACING_CHARS=1630
ANGLE_BETWEEN_TWO_CHARS=1.45
It's recommended to start by setting the radius to about half the resolution of your fisheye projector to RADIUS_FOR_PLACING_CHARS.
This is the radius used to position the text, which is about 490 for a 1080p projector and about 980 for a 2160p projector (when displayed at an altitude of 5 degrees).
However, if your console desktop is displayed at 150%, specify a value 1.5 times that.
The ANGLE_BETWEEN_TWO_CHARS parameter specifies the spacing between characters in degrees.
Please set it to be slightly wider.
ORIENTATION_A=0
POS_X_FOR_SCREEN_A=+50
POS_Y_FOR_SCREEN_A=+100
You can rotate the entire image using ORIENTATION_A:
0: no rotation, 1: rotate 90 degrees left, 2: rotate 180 degrees, 3: rotate 90 degrees right.
If south is at the bottom of your desktop, these correspond as follows: 0=South, 1=West, 2=North, 3=East.
The values POS_X_FOR_SCREEN_A and POS_Y_FOR_SCREEN_A represent the amount of movement from the initial display position (top left of the console desktop). The sign and value change depending on the position of the desktop for projector.
If you want to place another clock in a different location,
set ORIENTATION_B, POS_X_FOR_SCREEN_B and POS_Y_FOR_SCREEN_B.
Comment them out if you don't need them.
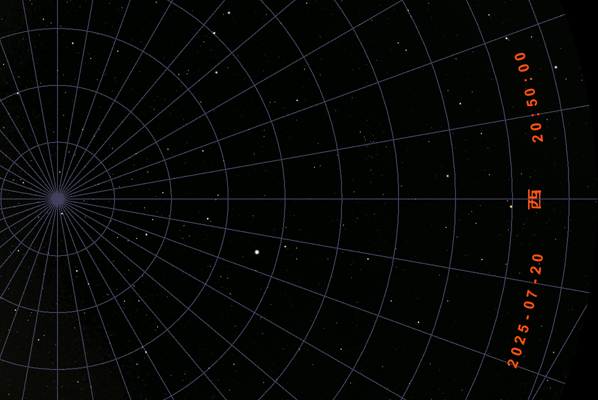
When making adjustments on-site, turning off the ground scenery and displaying the horizon grid makes it easier to fine-tune the values.
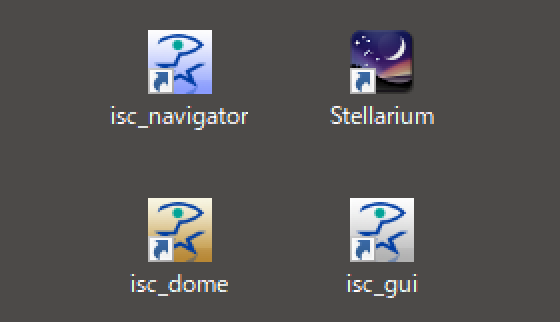
As explained in the setup section, to get started, double-click the desktop shortcut "isc_navigator" (to use as a desktop app) or "isc_dome" (for dome screen projection).
Before starting the planetarium presentation, be sure to click the "ALL" button in the "Initialize" section to reset the system. This is because the previous presenter may have left some settings. After resetting, you can set the time and other settings.
To exit, click the "Exit" button in the Interstellar Console main GUI. If you encounter problems due to software or hardware issues, click the "X" button in the main GUI or double-click "isc_gui" on the desktop, select "Exit Stellarium and ISC", and perform the proper shutdown process. If the shutdown process is not performed, the server processes will remain running.
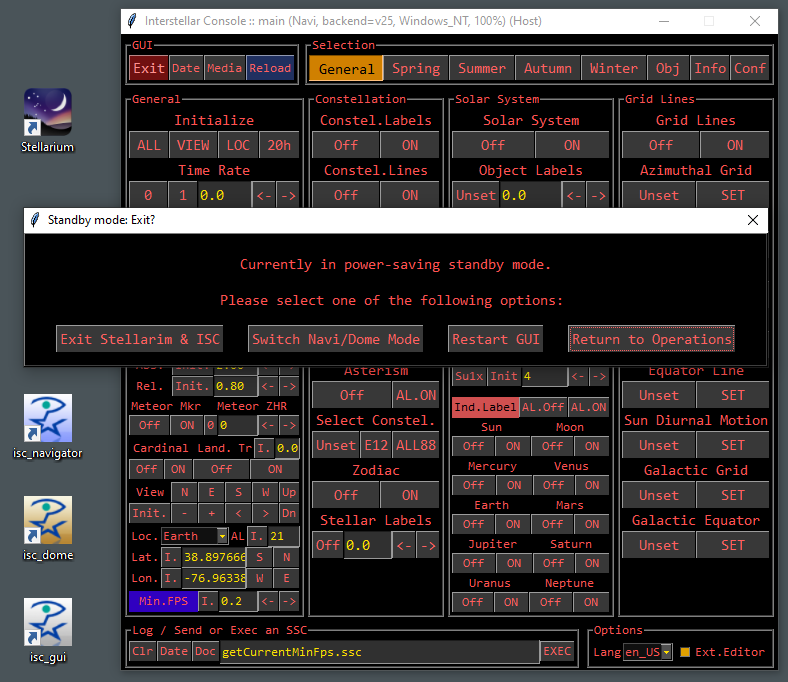
Once the projection program has finished, click the "ALL" button under "Initialize" section to ensure the next projection program starts smoothly. Then, click the "Exit" button and leave the dialog box (screenshot on the right) open. This will put the system into power-saving standby mode, reducing CPU and GPU usage to approximately 0%. Click the "Return to Operation" button when you want to start projection.
On Windows isc_remote.en.exe, run by double-clicking; on macOS, isc_remote.en.sh run by dragging and dropping into Terminal.
Up to nine remote machines can be connected to a single host machine.
On a remote machine, you can check whether it's in power-saving standby mode by looking at the "Minimum FPS" value in the main GUI. If it's less than 1.0, it's in power-saving standby mode and needs to be disabled. To disable it, click the "I." button in the Min. FPS section.
*Caution: Do not close the main GUI on the host machine. If it is bothering you, minimize it.
Clicking the "Edit" button in the GUI will launch an editor for editing the configuration file. After making changes and saving them, you will need to restart the GUI for the changes to be reflected.
Click the "Exit" button on the main GUI and select "Restart GUI".
Close the GUI using the "X" button on the window, then restart the GUI.
The display switches for constellations, asterisms, the solar system, grid lines, etc., have "ON/Off" and "SET/Unset" labels. Their meanings are as follows:
As a general rule, if the high-level switch is not turned on, the object is hidden regardless of the sub-switch's setting.
For example, to display the constellation lines of Orion, click the SET button for Orion, then the ON button for Constellation Lines. However, please note that if you click in the reverse order, Stellarium's "exceptional behavior when displaying constellations" will occur. If you click the ON button for Constellation Lines while all constellations are set to Unset, all constellation lines will be displayed.
To remove all constellation-related displays, click all the Off and Unset buttons within the Constellaton frame. This is to prepare for the next constellation display.
Regarding the Asterism, there is no "ON" button to display the lines, but when the "SET" button (the sub-switch) is pressed, the high-level switch is activated internally.
In the solar system and grid lines, upper and lower switches operate according to strict rules.
By default, both light pollution and moonlight are turned ON. If necessary, switch between them using the buttons in "Light Pollution" section in the General frame.
Stellarium does not have a function to "turn off only the moon," so in order to turn off the moonlight, you need to turn off the entire solar system. Therefore, the GUI is designed accordingly.
Light pollution and moonlight effects can be changed in the configuration file. Please see the settings section.
You can project sporadic meteor. To project, set the time rate to "1.0" (click the "1" button).
Stellarium's meteor-related features seem to be under development; you need to significantly increase the ZHR to see meteors clearly.
To advance (or reverse) the time on the planetarium at a constant speed, use the "Time Rate" setting in the General frame of the main GUI. Setting it to 1.0 will make it "real-time," setting a value greater than 1.0 will make it "fast forward," and setting a negative number will make it "reverse."
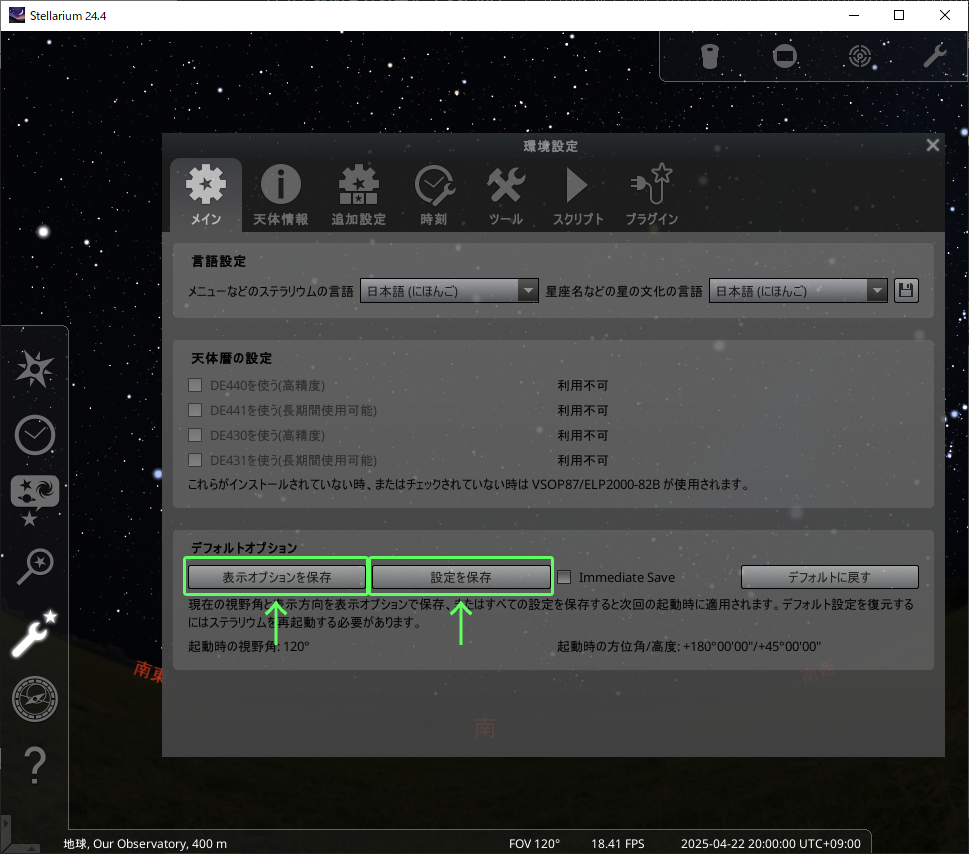
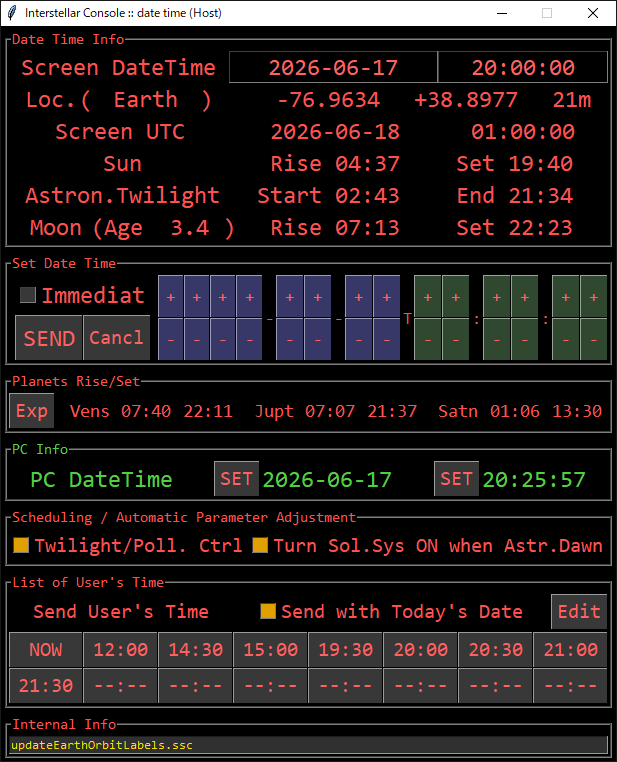
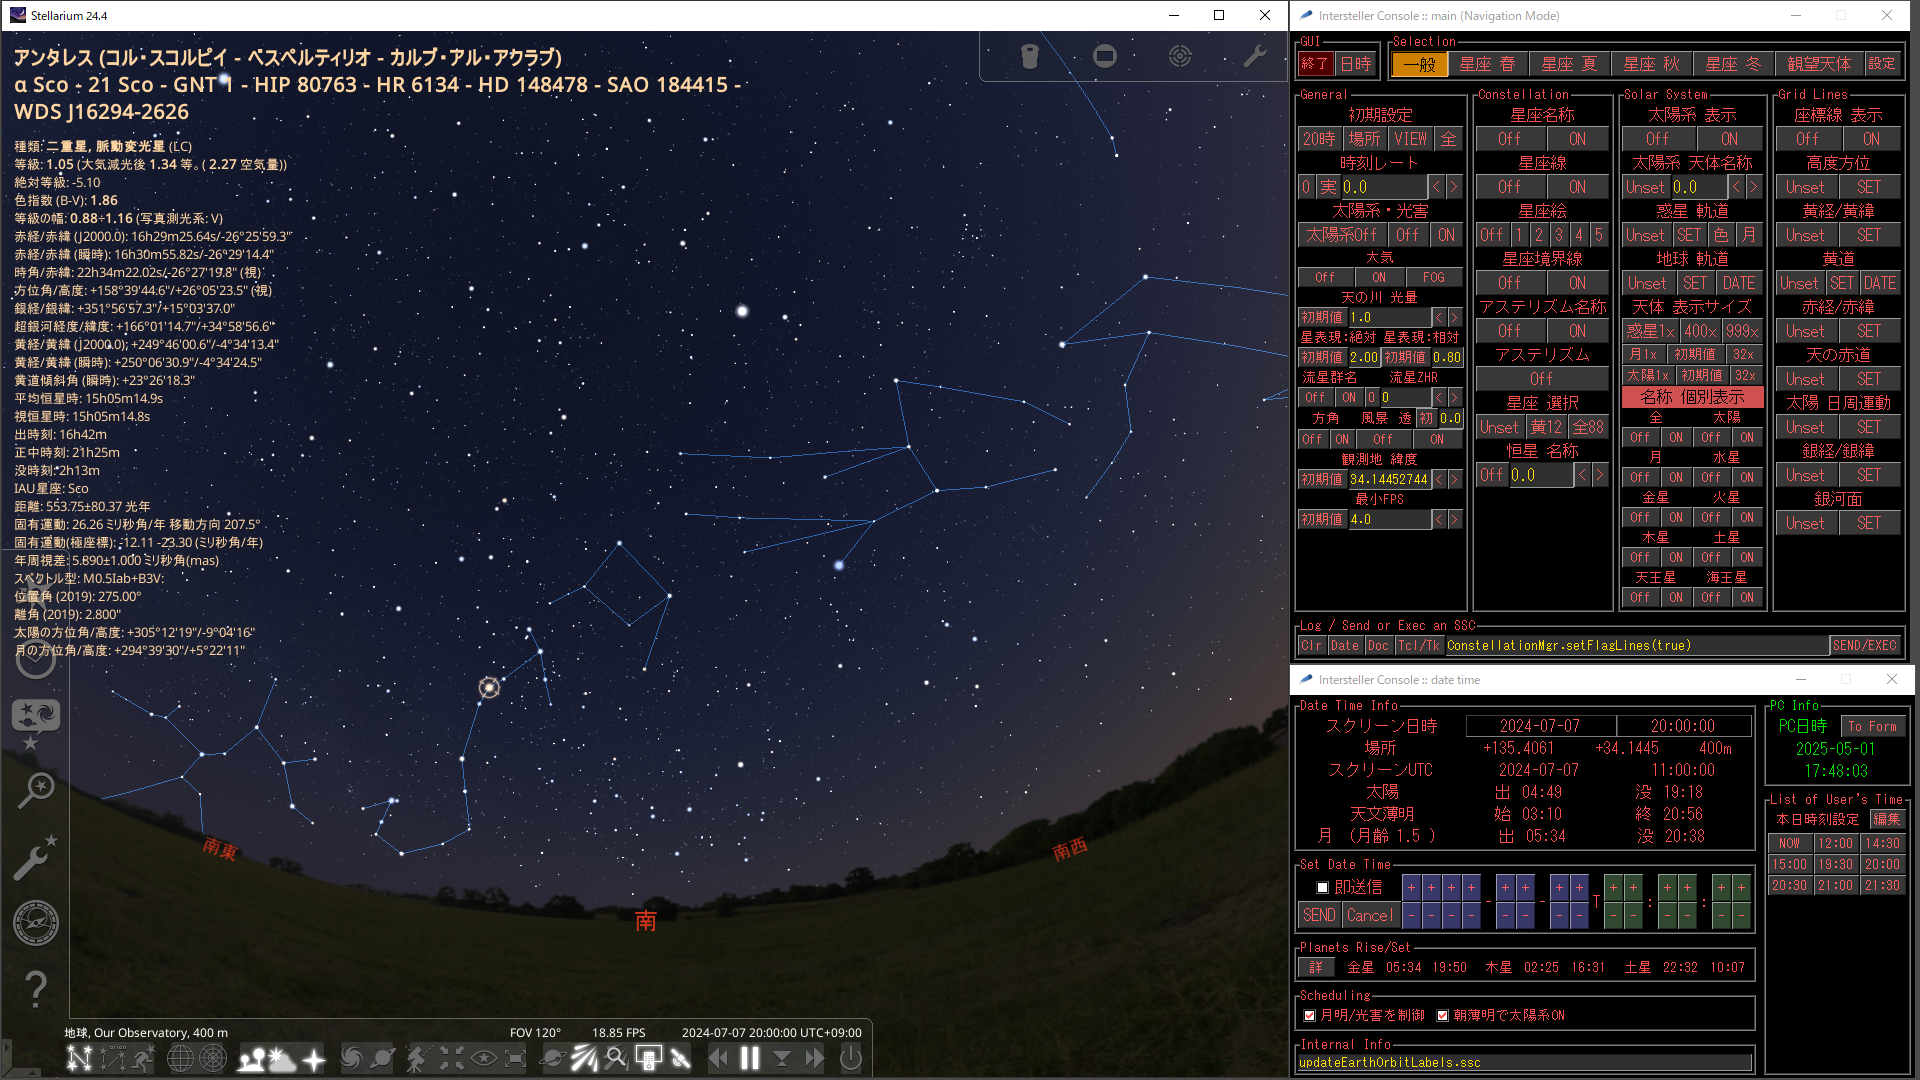
To set a specific date and time, use the purple and green buttons in the date and time GUI (see image on the right). If you check "Immediat," the date and time on the planetarium will be updated immediately after clicking the purple or green button.
You can also enter the date and time using your keyboard. Click the date or time to the right of "Screen DateTime".
It's convenient to register the projection start time in the "List of User's Time" frame. Clicking the "Edit" button will launch an editor for editing the settings file, allowing you to change its contents. After editing and saving, close the time setting GUI with the "X" and click the "Date" button in the upper left corner of the main GUI. The date and time GUI will restart, and the time buttons will be updated.
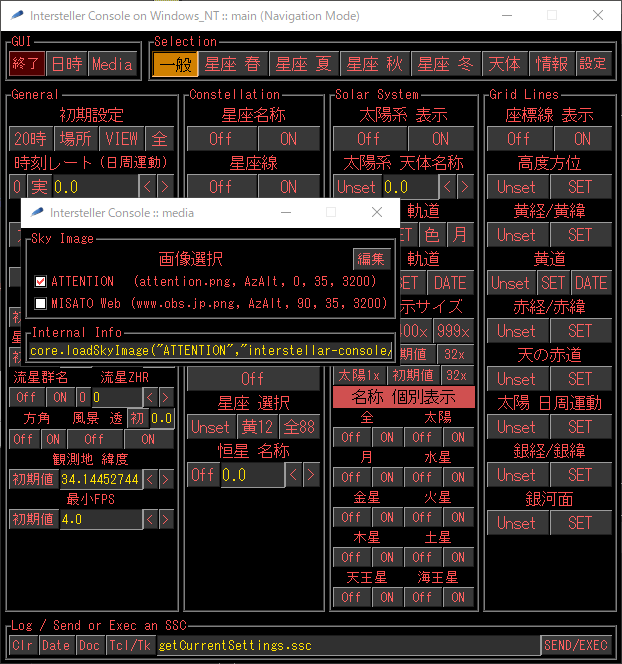
list_sky-image.txtClicking the "Media" button in the upper left corner of the main GUI opens the Media GUI. You can place pre-configured images into the empty space by clicking the checkboxes. Image placement and configuration are only possible on the host machine.
The image file you want to use should be a square in a common image format such as PNG or GIF,
and put them into C:\Program Files\Stellarium\scripts\interstellar-console\media on the host machine.
Please use only alphanumeric characters and symbols "_", "-", and "." in the filename (Multi-byte characters are not allowed).
The image will be displayed by additive blending with the sky.
In other words, (R,G,B)=(0,0,0) will not be displayed, so if the original image is rectangular, the margins should be be black when converted to a square.
Here's an example of how to create a black border using ImageMagick:
magick.exe foo_in.png -resize 1280 -background black -gravity center -extent 1280x1280 -dither FloydSteinberg -colors 256 foo_out.gif
The -dither FloydSteinberg -colors 256 option is an attempt to improve image quality in a GIF format that can only use 256 colors.
For images that don't use many colors, such as diagrams, the file size will be considerably smaller when converted to GIF format.
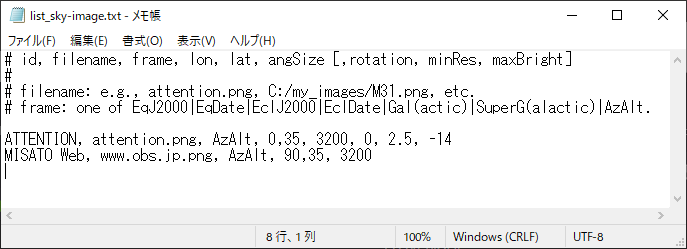
After placing the image file, click the "Edit" button in Media GUI to open the configuration file list_sky-image.txt in the editor,
where you can register the image.
The configuration file is in CSV format and contains sample files (attension.png, etc.),
so try changing the parameters in those lines and see how it works.
The parameters for each line are as follows:
_", "-", ".", and " " are allowed)
_", "-", and ".")
For example, if you want to display notices or a slideshow in the sky, specify "AzAlt" as the coordinate system and specify the azimuth and altitude for lon and lat.
Once you've registered the image in the settings file, close the Media GUI by clicking the "X" in the upper right corner, then reopen the Media GUI by clicking the "Media" button in the upper left corner of the main GUI. The contents of the settings file will then be reflected.
If you are using a remote machine, after configuring the settings on the host machine as described above, please reopen the Media GUI on the remote machine.
Since the images on a planetarium screen move very slowly, even when projecting onto a dome screen, a frame rate of 10 frames per second is sufficient to reproduce the motion of celestial bodies and prevent the images from looking unnatural. We figured that if we wasn't too ambitious, we could get a PC capable of handling paid live projections without spending a lot of money, so we purchased some cheap parts and conducted an experiment based on projection onto a dome screen at a resolution of 2160x2160.
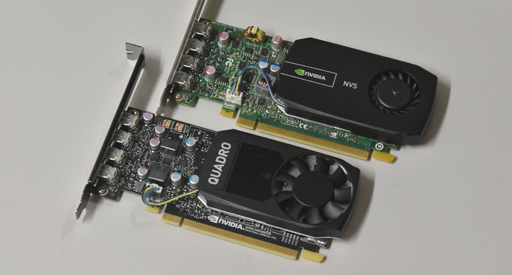
The most important component in component selection is the display adapter. Since Stellarium uses OpenGL, we'll consider NVIDIA Quadro or RTX, which are known to be optimized for OpenGL. Given the budget constraint, later models of Quadro (now a discontinued brand) are readily available secondhand, so we focused on building a system using entry-level Quadro cards. The PCs tested were the following five combinations:
Go to the summary of test results
Since most recent projectors accept 2160p (pseudo-4K) input, We experimented to see if Stellarium could render 2160x2160 at a sufficient speed. In the case of 12th generation Intel processors, the integrated GPU (UHD Graphics 730) generally outperforms the NVS 510 in typical benchmarks, so one might think that a display adapter is unnecessary if you're going to add an NVS 510. However, the following tests show that Stellarium is a special case.
The software and settings used in this test were: Windows 11 64-bit, NVIDIA driver Ver. 474.82 (note that Ver. 475.xx fails to install on the NVS 510), Stellarium 25.4 + ISC 1.4, resolution 2160x2160, ISC Dome Mode defaults (absolute star scale 3.0, relative star scale 0.7, FOV 190 degrees), no light pollution, no moonlight, 88 constellation names/lines/images enabled, and ecliptic date enabled. The test results using 460x-speed diurnal motion are as follows:
The results for 12th generation Intel + NVS 510 are interesting, and this may be due to the difference between "isolated graphics memory (NVS 510)" and "shared graphics memory (UHD Graphics 730)". With 12th generation Intel + Quadro P620, the frame rate exceeds 20 frames per second, which is more than enough performance for a planetarium projection PC. Since the NVS 510 and Quadro P620 have the same 2GB of memory, the main reason for the score difference is likely the difference between generations (difference in processor performance, difference in memory speed). The T600 adapter itself should have higher performance than the P620, with double the memory speed, but the score is the same as that of the Quadro P620, so if you want to go even higher, you will likely need to change the PC itself. However, with the "dark" and "slow" images of a planetarium, the difference is not noticeable above 20 frames per second, so if you want to go even higher, you will need to change the PC itself.
Based on the above results, the strategy is as follows: (1) Separate graphics processing from main memory to allow for sufficient headroom (avoid integrated GPUs), (2) High-end display adapters are not necessary, but use a relatively new generation display adapter (NVIDIA Pascal generation or later), even an inexpensive one.
In extremely difficult circumstances, you might want to use your PC for purposes other than Stellarium + ISC, so we tested it in other scenarios as well. The results are as follows:
For projection onto a dome screen with a resolution of up to 2400x2400, it was found that a desktop PC can be made low-cost and versatile for planetarium and full-dome projection by adding an inexpensive, relatively new display adapter. In the case of a laptop, you would need to choose a gaming PC with a built-in display adapter, so the advantage in terms of price is a desktop PC, which allows you to freely select a display adapter.
The test results are shown in the table below.
| Machine configuration | FPS at max. load | GPU usage | NVIDIA Mosaic | Mitaka | VLC | GPU price | Recommendation level |
|---|---|---|---|---|---|---|---|
| 12th Gen Intel + NVS 510 | about 10 | 100% | OK | OK | OK | Super cheap | If buy one, get P620. |
| 12th Gen Intel + Quadro P620 | about 21 | about 52% | OK | Good | Good | Super cheap | ***** |
| 12th Gen Intel + T600 | about 21 | about 37% | OK | Good | Good | cheap | ****- |
| 12th Gen Intel + Integrated GPU | 5 to 6 | - | - | Good | Good | - | *---- |
| 4th Gen Intel + Quadro P620 | about 10 | about 25% | OK | Good | Good | Super cheap | For backup |
The Quadro P620 is one of the most recommended display adapters because it significantly increases Stellarium's performance while remaining very inexpensive and low-power. A relatively new PC can provide more than enough performance for planetarium projection onto a dome screen, and even older PCs can be used as a backup projection machine. Furthermore, because Quadro supports NVIDIA Mosaic, it is compatible with professional 3200x2400 projectors and can even be used to build production environments for 4Kx4K full-dome videos (NVS also supports Mosaic, but 2400x2400 is somewhat challenging in terms of processing power).
For large, full-dome screens requiring area-divided projection using two or more projectors, a projection conversion system is necessary, and the specific projectors used also vary from case to case. Therefore, this explanation will focus on the single-projector systems.
There are roughly three types of single-shot projectors to consider.
Method 1 is too expensive, so we won't discuss it here. Method 2 seems simple, but it has many drawbacks, such as severe peripheral aberrations that make it difficult to read a clock placed near the horizon, and being limited to projectors that can be oriented vertically. Method 3 can achieve good image quality, and by using SLR camera lenses with a large flange back for both the relay lens and the fisheye lens, it is possible to bend the light path with a 2-inch diagonal mirror, making it possible to project a full dome even with projectors that cannot be oriented vertically, thus offering many applications. The LhoumeauSkySystem Open Project article is the most detailed, so it is a must-read in conjunction with Mr. Aida's article. Misato Observatory also plans to prepare a summary article in the future.
Projectors with a vertical resolution of 2160 or 2400 pixels are commonly used, but in Misato Observatory's experience, 2400-pixel vertical projectors require an NVIDIA Mosaic-compatible display adapter and two HDMI ports, and are prone to problems such as corrupted Mosaic settings, so we do not recommend them (see: Tips for NVIDIA Mosaic settings). Also, enabling NVIDIA Mosaic causes display issues with the Qt6 version of Stellarium, and it is possible that you will not be able to update Stellarium if the Qt5 version is discontinued in the future. We recommend a native 4K projector with 2160 vertical pixels that can output with a single HDMI cable from any PC.
An EDID emulator is a device that is recognized as a display by the PC and is intended to prevent the OS (such as Windows) from automatically changing the display settings. By inserting an EDID emulator between the PC and the display (or projector), the PC continues to operate as if the display were present, even when the display is turned off.
In professional projection systems such as planetariums, as well as in stock trading and projection mapping--where multiple displays and projectors are essential--it would be problematic if the OS automatically changed the screen layout based on the status of the displays or projectors. EDID emulators solve this problem by "fixing" the display settings on the PC. Many inexpensive emulators are available for commonly used resolutions like 1920x1080 and 3840x2160. Some display adapters also have functionality equivalent to an EDID emulator.
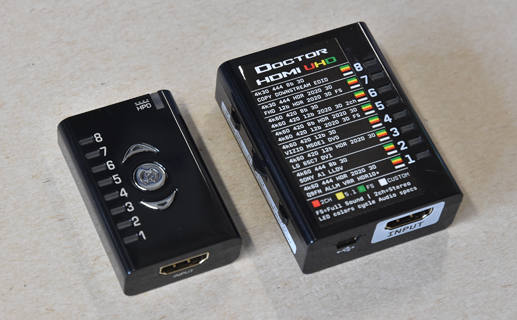
When using special resolutions or multiple displays "for business purposes," you need to choose programmable displays. Misato Observatory also uses HD FURY's "Dr.HDMI" for projection mapping and a 3D theater by Mitaka. Although it is somewhat expensive, it not only supports all resolutions but also allows you to set the display name for each individual display, making it an essential item, especially for projection mapping.
Software for Dr.HDMI can be downloaded from HD FURY's Dr.HDMI and Dr.HDMI 4k pages. For editing EDID data, Deltacast's EEDID_Editor is a convenient tool.
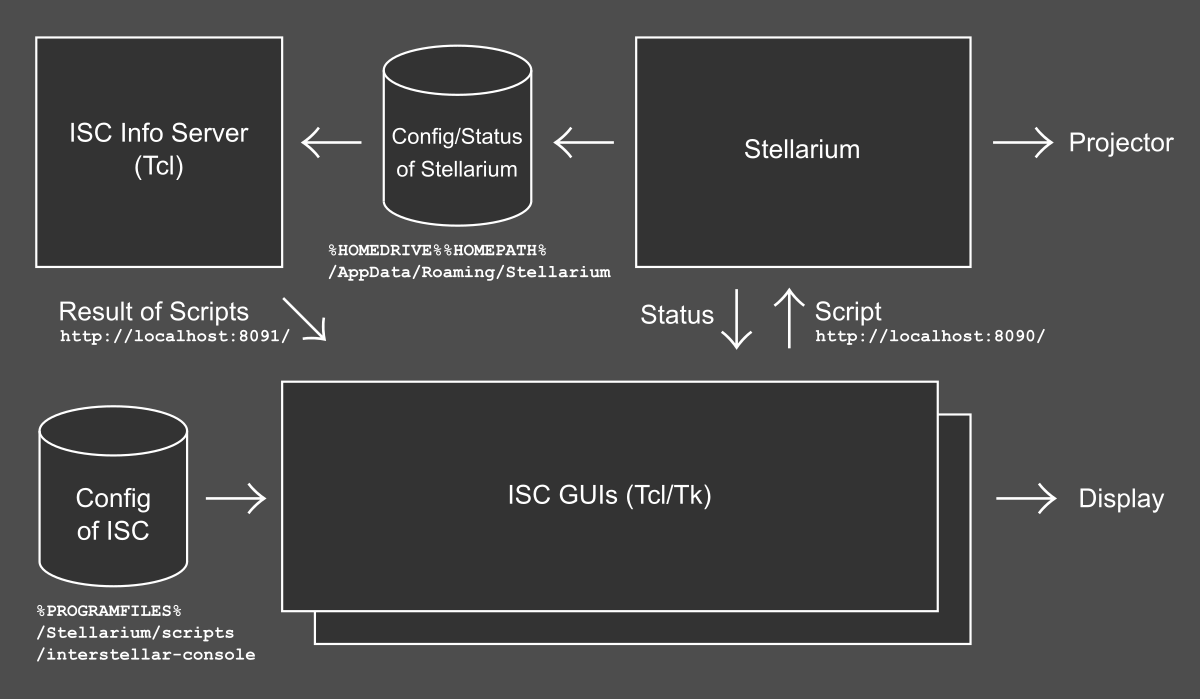
Our system basically consists of a backend using Stellarium and a frontend using a GUI (Tcl/Tk). The frontend is newly developed, but the backend is a pre-built product.
In such cases, it's usually impossible to meet the overall system requirements, and modifications to the backend become unavoidable. However, Stellarium has a very powerful "Stellarium Script" for controlling this, so no changes have been made to the Stellarium executable file.
This script is Javascript-based, making it easy to learn (API). Furthermore, you can send this script to Stellarium via port 8090 and retrieve pre-prepared statuses (date and astronomical data) (see documentation). However, output data and return values from executing the script, such as the label ID returned by LabelMgr, cannot be retrieved from port 8090, even though they can be output to a file. Therefore, a separate file reading process, "ISC Info Server" (an intermediate process), is launched in addition to Stellarium, and the script results are retrieved via port 8091.
The GUI for remote machines, supported from Version 1.3 onwards, is a version of the host GUI with host-specific widgets removed.
Some status information flows through the path Stellarium -> File -> "ISC Info Server" -> GUI,
requiring exclusive access control, but the "ISC Info Server" manages the nine remote machines by their IP addresses.
Version 1.4 introduces one more process not shown in the diagram.
This is isc-scheduler.tcl, a process dedicated to sending commands to Stellarium to adjust the star rendering during twilight and moonlight.
This process was previously included in the GUI code up to version 1.3, but has now been separated, resulting in improved GUI responsiveness.
Such multi-process, script-based systems have become easier to develop thanks to modern PC architecture (high-speed multi-core CPUs + GPUs).
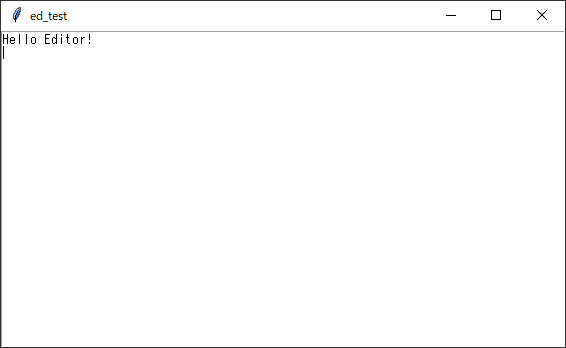
It's no exaggeration to say that building a GUI with Tcl/Tk is practically taboo. To get a sense of just how taboo it is, let's take a look at some code from a text editor:
text .tx -undo 1
pack .tx
And that's it! The basic structure of a text editor is complete in just two lines (how many bytes is that?). While it can't read or write files, it functions as a regular text editor with copy, cut, paste, and undo functions. Since you can create a GUI in this way, it's no surprise that it can be made so quickly.
Development of Interstellar Console began on February 5, 2025, and it was finalized in the Version 1 series just 11 days later, on February 16. It was put into regular use on February 22. We are certain that we could not have shortened the development period this much without Tcl/Tk, and we think that will come across to some extent to those of you reading this.
Three people were in charge of the coding. One person had experience with Tcl/Tk, but the other two had no experience at all. The two people with no experience were in charge of creating buttons for constellations and asterisms, but they were able to write the code just by inferring from the context of the code. For example, to place the Cygnus button (including alignment and specifying the function to call), you just need to write the following code.
frame .fr_cyg
label .l_cyg -text "Cygnus"
button .b_cyg1 -text "ON" -command "update_constellation Cygnus true"
button .b_cyg0 -text "OFF" -command "update_constellation Cygnus false"
pack .l_cyg -in .fr_cyg
pack .b_cyg0 .b_cyg1 -side left -expand 1 -fill x -in .fr_cyg
Another reason for choosing Tcl/Tk is that, from a maintainability standpoint, we didn't want to increase the number of programming languages we was using. While Tcl/Tk is slower, it has fewer design constraints and security limitations, allowing for considerable freedom in creating PC applications--in other words, "you can create anything if speed isn't a priority." If speed is absolutely necessary, you can simply use an approach that involves running the application in multiple processes, and Tcl excels at inter-process communication required in such cases.
Generally, we think that creating such a console as a web application offers the best portability. Of course, if Stellarium's functionality were perfect for our planetarium shows, we could complete everything with just a browser-based application like the Stellarium console included with it, but unfortunately, that's not the case. We need to start a server process to read specific statuses from Stellarium, and overlay an on-screen clock on the Stellarium window. In other words, we need to create a PC application. With Tcl/Tk, we can create all of that in the same language as the GUI. Socket communication, mutual exclusion, character code conversion, and everything else can be implemented easily and reliably.
var current_sky_culture_id = core.getSkyCulture();
if ( current_sky_culture_id != sky_culture_id ) {
  core.setSkyCulture(sky_culture_id);
}
Landscape should also be written with similar code:
var current_id = LandscapeMgr.getCurrentLandscapeID();
if ( typeof landscape_id_rural === 'undefined' ) {
  if ( current_id != landscape_id_default ) {
    LandscapeMgr.setCurrentLandscapeID(landscape_id_default);
  }
} else {
  if ( current_id != landscape_id_rural ) {
    LandscapeMgr.setCurrentLandscapeID(landscape_id_rural);
  }
}
NaN.proc send_ssc_to_initialize_view" and
"proc send_ssc_to_initialize_all" in
misato-gui.tcl.
core.wait()core.wait() in a Stellarium script will cause it to become unresponsive to other scripts while waiting (an error will be returned).
This is something to be aware of when sending multiple scripts consecutively to Stellarium from an external program.
It is safer to avoid using core.wait() and handle timing adjustments from the external program.
Vec3f type in args, so you create an object using new Color() and convert it using .toVec3f() method before passing it to the method, as shown below.
const equator_grid_color = new Color(0.7, 0.1, 0.1);
GridLinesMgr.setColorEquatorGrid(equator_grid_color.toVec3f());
However, there are also methods that require string hex color (e.g.,
"#a1b2c3"),
in which case you can convert it using the .toHex() method (see: V3f Class Reference).
const individual_star_labels_color = new Color(0.85, 0.85, 0.85);
const hex_color = individual_star_labels_color.toVec3f().toHex();
id = LabelMgr.labelObject(" " + "Sun", "Sun", True, 32, hex_color, "NE", -1.0, "TextOnly", false, 0);
const output_file = "foo.isc.txt";
core.resetOutput();
core.output("Hello World!");
// written in %HOMEDRIVE%%HOMEPATH%\AppData\Roaming\Stellarium
core.saveOutputAs(output_file);
var v = 24;
if ( !(typeof ConstellationMgr.setFlagZodiac === 'undefined') ) {
  v = 25;
}
For external programs, refer to the [main] section in config.ini
located in C:\Users\USERNAME\AppData\Roaming\Stellarium.
const square_image = "square_pink_1px.png";
// length
const dash_size_lon = 1.80;
// width
const dash_size_lat = 0.11;
To draw a line, use
core.loadSkyImage(), which has the most arguments:
var x0, y0, x1, y1;
x0 = pos_lon - dash_size_lon;
y0 = pos_lat - dash_size_lat;
x1 = pos_lon + dash_size_lon;
y1 = pos_lat + dash_size_lat;
core.loadSkyImage(image_obj_id, stellarium_script_dir + "/images/" + square_image,
                  x1,y0, x0,y0, x0,y1, x1,y1,  2.5, -14, flag_show, "EqDate", true);
The order of the elements following the third argument, x1, is fixed.
Please note that if you specify them in an unexpected order, nothing will be drawn.
LabelMgr:flagGravityLabels is True (in the case of Dome mode),
the labels created by LabelMgr are somehow positioned in an unbalanced manner.
To minimize this problem, add a space character to the beginning of the label text and specify side = "NE" and distance = -1.0 as follows:
id = LabelMgr.labelObject(" " + "Sun", "Sun", True, 32, "#d0d0d0", "NE", -1.0, "TextOnly", false, 0);
Note that when flagGravityLabels is set to False (in Navigation mode),
even if you specify "E" or "N" for side,
it behaves as expected.
It appears that LabelMgr has not been sufficiently tested (see: LabelMgr.cpp).
This may be fixed in future versions of Stellarium.
core.setTimezone()
core.setTimezone("Asia/Tokyo", 1);
As noted above, be sure to pass 1 as the second argument. If omitted,
core.setObserverLocation() will initialize the time zone.
constif(){ }`, etc., are local) does not work.
However, in anticipation of future specification changes, you should avoid writing code that relies on this behavior.
When using const in if statements, for statements, and similar constructs, ensure your code works correctly regardless of whether block scope is enforced or not.
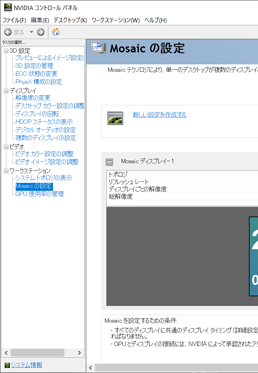
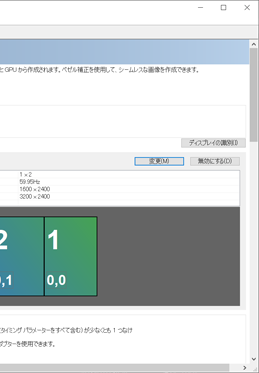
NVIDIA Mosaic settings allow you to configure multiple projectors to be recognized as a single display. Normally, these settings are configured via the GUI in the NVIDIA Control Panel, but using the Mosaic Utility allows you to configure them via the command line (CUI) and makes it easier to recover if the Mosaic settings become corrupted. Download the Mosaic Utility and use commands like the ones below to configure the Mosaic settings. For details, please refer to the official documentation.
# For example, with two projectors, each with a resolution of 1600x2400 and a refresh rate of 59.948 Hz,
configureMosaic.exe set rows=1 cols=2 res=1600,2400,59.948 display=[display-ID1] display=[display-ID2]
You can check display-ID1 and display-ID2 using the commands below.
configureMosaic.exe query gpu
We used the following free software for this project:
Furthermore, the following digital planetariums were used as references when designing the GUI:
I would like to express my gratitude to the developers and everyone involved in their creation.
We would like to thank Mr. Kazuhiko Honda and Ai Planet for their bug reports and requests regarding Interstellar Console, and everyone else who submitted reports.
Misato Astronomical Observatory
E-mail: info (at) obs.jp
Tel.: 073-498-0305
Last Modified: Jun. 24, 2026


